There’s a lot that can go wrong with your roof. From whirlwinds to tornadoes, a wide variety of things can damage it in some way.

Whatever the problem, you should always repair it sooner rather than later. Waiting only gives moisture more time to cause more problems.
Your roof is a tough piece of protection. It withstands storms, wind, sleet and snow for decades. But, like anything else in your house, it will eventually wear out, even if you do all the right things to maintain it. And when it wears out, it lets water into your home, causing mold and mildew, wood rot in the substructure and a host of other problems. That’s why it’s so important to make the most of preventative repairs instead of just replacing your roof when a problem shows up.
If your roof is in need of a repair, the first thing you should do is take an inventory of the damage. Start by going into your attic, crawl space or whatever access you have to the underside of the roof and look around. Look at the insulation, rafters and sheathing for stains that are a sign of leaks. If the areas are stained, you need to do a better job of identifying the source of the leak, and you need to act fast if there’s a leak.
Look for shingles that have blistered, popped or split. These shingles will eventually let in moisture and cause rotting. Also check for moss growth and any shingle that has been lifted up. These are signs of trouble and should be repaired by a professional.
Another common cause of leaks is a damaged vent. The vent’s housing is held in place by shingles, and a cracked housing can allow moisture into the attic. To fix this, you can either replace the vent or apply caulk.
Sometimes a leak will show up on the ceiling at a spot far away from where the water is flowing. This can be a sign of bad flashing, which is a critical part of your roof. Flashing is made of weatherproof plastic or sheet metal and is installed in the most vulnerable areas, such as the creases around fixtures like skylights and chimneys. It keeps these awkward connections sealed and prevents water and air from getting into places where they should not be.
Remove the Damaged Shingles
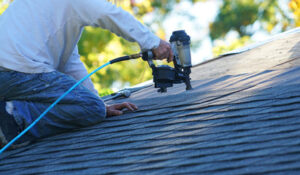
The first step in a roof repair is to remove the damaged shingle. Start with a flat pry bar and slowly work it under the edge of the shingle you want to remove. This will break the sealant bond holding the shingle to its neighbors and should make it easy to pull free. It is best to do this in cool weather, as the shingles are more easily separated when the adhesive sealant is not hot.
Once the shingle is free, look for the nails that were used to hold it. These may be hidden from view by the shingle above, or they may be visible at the top of the shingle. If the nails are exposed, you should consider adding more protection to the roof, as they will be vulnerable to the elements.
Ideally, you should use waterproof roofing nails to replace the old ones. These are available at most home improvement stores and are specifically designed to resist water leaks. They are usually longer than the old nails, but they will still fit in most existing holes.
Before replacing the shingle, clean off any residue cement with a brush and scraper. Then, apply a thin layer of asphalt roofing cement to the area where the shingle was removed and slide in the new one. Remember to align it with the shingles on either side of it and nail it in at each nail hole.
This will give you a good idea of how well the roof is in general condition. If it is in very poor shape, you may be better off removing the damaged section and re-roofing the entire house. It’s always better to catch problems early, before they cause extensive damage and potential safety issues for your family. Keep your eyes peeled for brittle or cracked shingles, leaks, or any other sign of a problem with your roof. You can prevent serious problems by taking these simple steps, and a bit of diligence when looking at your house.
Repair the Flashing
Flashing is the thin metal strips roofers use to seal out water around the edges of a roof, chimneys, pipes, vents, skylights and where two roof pitches meet at a valley. It is designed to move with the roof as it expands and contracts and blocks crevices that could allow water to penetrate a roof, particularly during hot and humid weather.
Flashing should be inspected regularly for signs of damage such as rust, corrosion, cracks, gaps or loose sections. If any of these issues are found, the flashing should be repaired promptly to prevent leaks.
Repairing the flashing usually requires removing some of the roof shingles to access it, which is why many homeowners choose to hire professional roofers for this type of roof repair. A professional roofer will carefully remove the damaged shingles, then use caulking or roofing cement to seal the area where the flashing is located. They may also use roofing nails to secure the new flashing in place.
Once the flashing is in place, a roofing contractor will cover it with additional caulking or roofing cement to ensure a strong and secure bond. They will then replace the shingle over it, making sure it is properly positioned and secure. They will also use a heavy-duty ice and water barrier at the edge of the roof where the soffit meets the main roof to further protect it from leaks.
If you decide to tackle a roof repair on your own, it is important that you wear proper safety gear such as work boots and a ladder that is in good condition, as well as a pair of protective gloves and eyewear. You should also cover any plants or foundation plantings with tarps to keep them safe from falling debris and nails. In addition, it is wise to have a ladder with locking steps to prevent it from sliding while you are working on the roof. Finally, make sure to have a dumpster nearby to dispose of any shingles and other debris you remove from the roof. Failure to take these precautions can result in expensive damage to the roof and property below.
Install New Shingles
When the weather turns cold and windy, your roof’s shingles take a beating. Between storms, aging and sun exposure, all of the above can cause damage to each individual shingle. Even a single missing shingle creates a vulnerable spot on the roof, making it more susceptible to leaks. When you’re able to repair the damaged area, the rest of your roof can stay in good shape and prevent other problems from arising.
The good news is that most people can safely tackle a roof repair project without needing to hire a professional. If you’re comfortable working on a ladder and have the proper tools to access your roof, the entire process shouldn’t be too difficult. The most important thing to remember is to always wear safety gear and have a partner for support when working on your roof.
Before you get started on the actual work, you’ll need to rent a dumpster and put down tarps to make cleanup easier when it’s finished. Also, make sure that you’re repairing the right kind of shingles for your roof and that you’re using the correct nailing pattern for your region’s climate.
Once the roof and tarps are ready, it’s time to start the actual repairs. You should only do this when the weather is calm and dry. You don’t want to be climbing around on the roof during a howling storm, torrential rain or blizzard!
Start by removing the damaged shingle. You should then cut a new shingle to the correct size and nail it in place. Be sure to use the same nailing pattern as the original shingle and spread a thin layer of sealant on top. This will help prevent water penetration from the roof and other issues like mold, rot and decay.
If you can’t find any damaged shingles on your roof, you should be able to identify other signs of problems by checking inside your home. Look for soft water spots or stains in the ceilings, walls or other parts of your house. You may also notice sunlight shining through into the attic. This is an indication that the shingles or roof structure are deteriorating and should be repaired immediately to prevent leaks, mold, rot and other expensive and extensive damage.
